Hello and welcome back! Prior to our quick detour, we talked about three different lesson formats for your course prototype: video, slides and text.
It stands to reason though that whatever format you choose, your lessons will only be as good as the content you put in them.
How to Create Consistently Good Content
To create consistently good lessons, you need a good process. So in this lesson I’ll teach you a reliable workflow for taking a lesson idea in your course blueprint and turning it into an asset that’s complete enough for your beta.
If you’ve decided to deliver your lessons live for your beta, it could be a basic slide deck, or a few notes to guide you as you speak directly to the camera.
Otherwise it’ll be some kind of “produced” asset like a video you upload to your chosen course platform, or a text lesson you format on the page.
By the way, you’ll use essentially the same workflow for creating the final, polished versions of your assets when the time comes for your full course launch.
A Simple 3-Step Workflow for Lesson Creation
While the finer points of lesson production will depend on your lesson format and approach to delivery, the creative workflow is essentially the same.
After all, the concepts you teach and the examples and so on you include shouldn’t fundamentally change based on whether you’re using video or text.
So here’s the workflow in overview, starting with a simple lesson plan, and ending with a finished course asset in your chosen format:
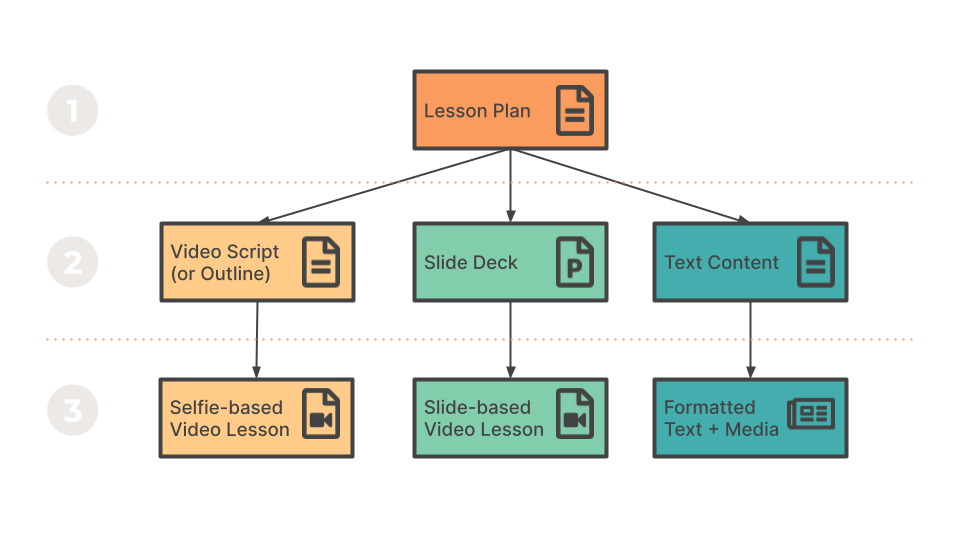
- Create a simple lesson plan, including a high-level outline your lesson content
- Build your outline into a lesson draft (i.e., a video script, a slide deck or text content) by filling in the gaps and evolving the content
- Turn your draft into a finished asset (if required)
This is my preferred workflow, but you’re already a seasoned content creator, and you have a process that works for you, I recommend sticking to that.
However, if you’re not a content creation veteran, or you want to see if a change in your process can produce better results, give this simple workflow a try.
Let’s look at each of the steps in turn.
Step 1: Create a Simple Lesson Plan
The first step is creating a simple lesson plan. This will give you clarity on what your lesson must achieve in the context of the whole course and will make the content creation process quicker and smoother too.
In the next lesson I’ll give you a simple template and walk you through the main sections, which include a section for adding an outline of your main points. This ensures that your finished lesson hits all of the right marks, in the right order.
While it’s arguably more fun to jump straight into content creation, I believe that creating your lesson plan will save you time overall.
Step 2: Build Your Outline into a Lesson Draft
As soon as you’ve completed your lesson plan, the next step is copying your lesson outline into a blank document to create the “skeleton” and fleshing it out into a complete draft.
If you’re writing a video script or the content for a text-based lesson, you’ll use Microsoft Word or Google Docs or whatever other software you use for writing. In this case, you can copy each point from your outline as a document heading.
If you’re creating a slide deck, you’ll use PowerPoint or Keynote or whatever your favourite software is for presentations. Here you can turn each main point into a separate “Section Heading” slide.
Once you have a basic structure, you can start fleshing out the content. So you’ll explain and expand the main points by adding sub-points to fill in the gaps, then add other content like examples, data, etc.
To help you along, I’ll give you a set of handy prompts you can use as you build out your lesson.
When you have a rough first draft you can step back and review the material from the perspective of a student and identify areas that still need work.
For this task, I’ll give you a checklist so that you know exactly what you’re looking for.
This process continues until your lesson draft is good enough to put it in front of your future students, either delivered live or turned into a standalone lesson.
Step 3: Turn Your Draft into a Finished Asset
With the “good enough” draft of your video script, slide deck or text lesson created, you can produce the corresponding asset you’ll upload to your course platform.
(Unless you’ve opted for live delivery for your beta, of course.)
Depending on your format, that will mean doing one of the following:
- Recording yourself while presenting your video script or lesson notes to the camera then editing it to create a selfie-style lesson.
- Recording yourself while presenting your slide deck (without or without webcam video) then editing it to create a narrated presentation-style lesson.
- Formatting your lesson text and adding any supporting media (images, etc.) to create a blog-style lesson.
Note: If you’ve chosen slide-based lessons but don’t feel confident enough to present them on the fly, you can always script your narration in full.
Ready to Move On?
So that’s the basic workflow. You write your lesson plan, create and revise your draft, then produce your finished lesson.
Soon the steps will become second nature and it won’t feel like a formal workflow, it’ll just be “creating another lesson”.
Next, we’ll start our deeper dive with the one-page lesson plan, which will help you clarify your lesson’s purpose and invite you to create a high-level outline.