Hey there. Great to see you. So you’re ready for another lesson? Excellent! Let’s get started.
Why an Outline Is Necessary but Not Enough
In the last lesson I explained how to create a high-level outline for your lesson, and I introduced you to a few lesson archetypes like Problem-Solution.
But as useful as an outline is, it would take a very confident presenter to deliver a whole lesson, live or recorded, based on a short list of one-sentence bullet points!
So unless you have that superpower, you’ll still need to fill in the lower-level details. And that means taking your outline and turning it into a lesson draft.
(Remember the three-step workflow from earlier in the module? This is Step 2.)
What a Lesson Draft Looks Like
What your draft looks in practice like depends on your lesson format and your approach to delivery.
Practically speaking though, it’s whatever you need to confidently deliver your lesson. For instance:
- For selfie-style (or “talking head”) videos, your draft will either be a list of bullet points to guide you when you speak or a full script to read.
- For presentation-style lessons, whether live or recorded, your draft will be a basic slide deck, plus any notes or script you create to support your delivery.
- For a blog-style format, your draft will be the text content for the lesson, minus any supporting assets like images and diagrams.
As you can see, you have a few different options.
The Content Development Pyramid
To help you understand the process better, I want to give you a quick model to help you conceptualise it: the content development pyramid.
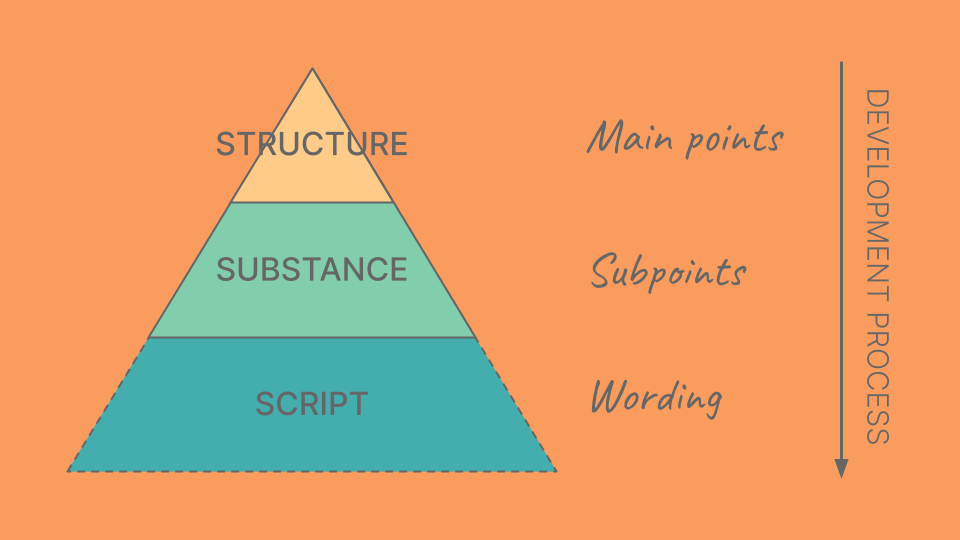
Developing your draft means moving between three different levels of detail:
- At the top level you have your outline, which has your 3–7 main points. That gives you the fundamental structure of your lesson.
- The middle level breaks your outline down into its individual subpoints. That gives you what I call the substance of your lesson.
- The lowest level is the wording you actually use to express your main points and subpoints. And you could call that the script of your lesson.
So when I talk in the title of this lesson about “filling in the gaps”, I’m talking about taking your outline and adding the substance.
Side note: depending on your approach, you may not need a script at all. It could just be whatever comes out of your mouth when you present your slides or notes!
How to Visualise Your Lesson
If you’re a visual type of person, I find it helpful to imagine the development process as being like drawing a “sawtooth” shape like this:
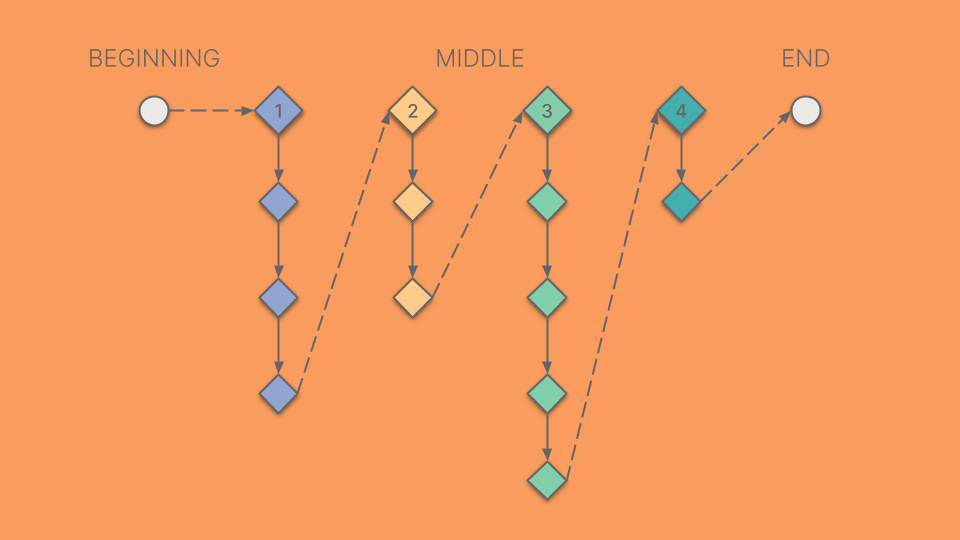
For each of the main points in your outline, you add subpoints to expand, support and deepen that point. Once you’ve said everything you need to say, you transition to the next main point and repeat the process.
So you’re moving down and down below one main point before skipping back up and across to the next one. Hence the sawtooth!
How Do Subpoints Work?
So how do these subpoints work and where do they come from?
Well, fleshing out your lesson is not so very different from developing another type of communication like a report, or essay, or talk. Even writing a good email means breaking your main idea down into smaller points and organising them logically.
You just have to look at each main point in your outline and decide what needs to be said before you can safely transition to the next point.
Another way to think about it is roughly 10 to 20 seconds of lesson time. That’s very approximate but it gives you some idea of the amount of content I mean
And typically you’d have 2–5 subpoints for each main point.
6 Prompts to Help You Uncover Your Subpoints
Here are some prompts that can help you uncover your subpoints:
- What related ideas do students need to understand first?
- What extra details need to be included about the main point?
- What arguments are needed to make the main point more persuasive?
- What common misconceptions about the main point need to be corrected?
- What can you say to make sure people don’t get stuck or confused?
- What needs saying to set the context for the next point?
In fact, do you remember the analogy I used earlier in the module about a lawyer building a case for the jury?
I said that the main points of your lesson “build the case” for your lesson outcome.
In exactly the same way, you can think of your subpoints as building the case for the main points they support.
What Does a Subpoint Actually Look Like?
What your subpoints look like when they appear in your lesson draft will depend on the format:
- For a selfie-style video, a subpoint would be a single bullet point, or a short sentence under one of the main headings on your page of presenter notes.
- For a slide-based lesson, a subpoint would be a single slide, or even a single bullet point, depending on how sparse or dense you want your deck to be.
- For a text-based lesson, a subpoint would most likely translate to a single paragraph or a run of short paragraphs.
Sometimes each of your subpoints builds on the last, and so they have a logical order.
Other times, the order is less important, like a list of reasons something is true.
Ready to Move On?
I hope that’s demystified the process of turning your lesson outline into a lesson draft.
It’s a very structured process and I make no apologies for that. It’ll suit some people better than others.
If you prefer to develop your lesson content more instinctively, letting the structure emerge as you go, that’s fine. Whatever works best for you.
But if you ever find yourself getting lost in the weeds, step back and try a more structured approach like this one.
Okay, we’re done. Over the next couple of lessons we’ll look at how you can take your draft from good to great.
See you there!