Whether you’re a hobbyist or a business owner, Podia is a great platform for building your online home.
It offers a ton of features you’ll need for success: web pages, digital products, email marketing, member community, and much more.
But there’s been one conspicuous gap in this feature lineup: blogging.
Publishing content regularly via a blog is a great way to create awareness for your site (and your project or business) and gives you a constant stream of things to talk about on social media.
Fresh content is also a major signal to search engines like Google and Bing that your site is one to watch (and hopefully feature in their results pages).
However, until very recently Podia did not support blogging out-of-the-box.
With the release of Podia Blogging though, this has all changed. And the good news is you can get started for free.
Get Started with Podia for Free
Shortly, I’ll walk you through all the steps for setting up a blog on Podia.
But first, in case you’re new to blogging, let’s have a quick introductory lesson.

Blogging 101
A blog, essentially, is a dedicated area on your website where visitors can find a collection of articles or “blog posts”, usually organised by date.
You can think of a blog as a growing library of articles on a related topic. And when visitors arrive on the blog page of a website they’ll see a list of the most recent posts.
So you have one blog per website and multiple blog posts within a blog.
With me so far? Excellent!
An individual blog post is really just a web page containing text and other media like images and embedded videos. But where a regular web page can have any layout you like, blog posts all tend to follow the same basic template.
Many blog platforms also support blog post comments to encourage interaction, so your readers can have a discussion about your ideas underneath the post itself.
Additionally, some platforms allow your blog posts to be organised according to categories and tags to help users drill down to certain subtopics and themes.
And that’s really all you need to know!
With those foundations covered let’s get into the steps for starting a blog on Podia.
Step 1: Pick the Right Blog Topic
The first step if you’re starting from scratch is picking the right blog topic. Your topic can make or break your blog.
If you’re creating a blog to support an existing business, your topic should be fairly obvious — write about whatever your potential customers want to know about.
However, beware of going too broad (you don’t have to write about everything they might be interested in) and make sure something about the way you tackle the topic is distinctive.
Maybe it’s your unique outlook. Maybe it’s your tone of voice. Maybe it’s the fact that you focus on one narrow area of the broader topic.
Whatever it is, make sure that people have a reason to follow your blog instead of the alternatives.
If you’re starting with a clean slate, you have various ways to decide on your best blog topic. You can:
- Follow your passion: Blogging about something you love makes the process more enjoyable. So think about topics that get you excited and get other people excited too.
- Write what you know: Passion is great but so is specialist knowledge. If there’s a topic you know well compared to the average person, that could be a good choice too.
- Look for trends: When a topic is new there’s often a shortage of good content. Helping people keep up with a fast moving area can easily give your new blog an advantage.
If you’re lacking inspiration, you’ll find it useful to know that many popular blog topics are found within in the ever-popular categories of health, wealth and happiness.
(Each of these is too broad to be a blog topic on its own, but some narrower version of any of them could make a good starting point.)
Whichever path you take, stick to the golden rule of: one blog, one topic. In other words, don’t try to cover too many topics under the same umbrella.
Just because you are interested in geckos and online marketing it doesn’t mean your blog should cover both!

Step 2: Choose a Memorable Domain Name
The next step is deciding on a domain name for your blog. Every blog deserves a good name and yours is no exception.
If you’re building a whole website where the blog will be just one area, your domain name should reflect the site as a whole. For instance, if it’s a small business blog your domain is probably connected to your business name. In fact, you may have registered the domain already.
However, if your blog is the main focus, the domain name should reflect the topic of your blog.
Fortunately you don’t have to finalise the name right away if you don’t want to.
Podia gives you two options when it comes to domain names: a subdomain or a custom domain.
Choosing a subdomain means creating your blog as an “offshoot” of Podia’s main domain, for example: geckocity.podia.com.
Note: If you’re using a subdomain you can do that for free on Podia. It’s also easy to change the subdomain if you change your mind.
Alternatively, you can register a custom domain name (like geckocity.com) and link it to your Podia account.
Note: if you want to use a custom domain on Podia you’ll need to be at least on the Starter plan ($4/month if you pay annually). There are many good domain registrars to choose from — I personally use NameCheap.
Although it’s fine to start out with a subdomain, longer term it’s much better to build your presence on a domain you actually own.
So how do you come up with the right name?
Branding blogs is an art in itself, but here’s some quick advice when naming:
- Clear is usually better than clever, so make sure the name of the blog is immediately suggestive of your blog topic
- Shorter domain names that are easy to read are better than longer ones that are harder to decode
- Mainstream domain extensions like .com, .org, and .net are usually better than more obscure ones (although country-specific domains like .co.uk are fine too.)
P.S. I wrote an article about naming online courses and a lot of the same ideas apply to naming your blog too.
Step 3: Create Your Distinctive Blog Design
The next step in the process is designing the visual appearance of your blog.
Podia’s site editor already offers lots of options for creating a modern-looking and mobile-responsive website, and the new blogging feature leverages those existing features to great effect.
The good news is that you don’t need a professional designer to create an attractive-looking blog. Podia’s “sections and settings” approach to page building gives you a lot of flexibility while also keeping you with in the limits of good design.
For reference, when creating a regular page (like an About Page) you build your content from the top down, adding easily configurable sections like Text, Image, Video, Grid, Bio, FAQ, and so on.
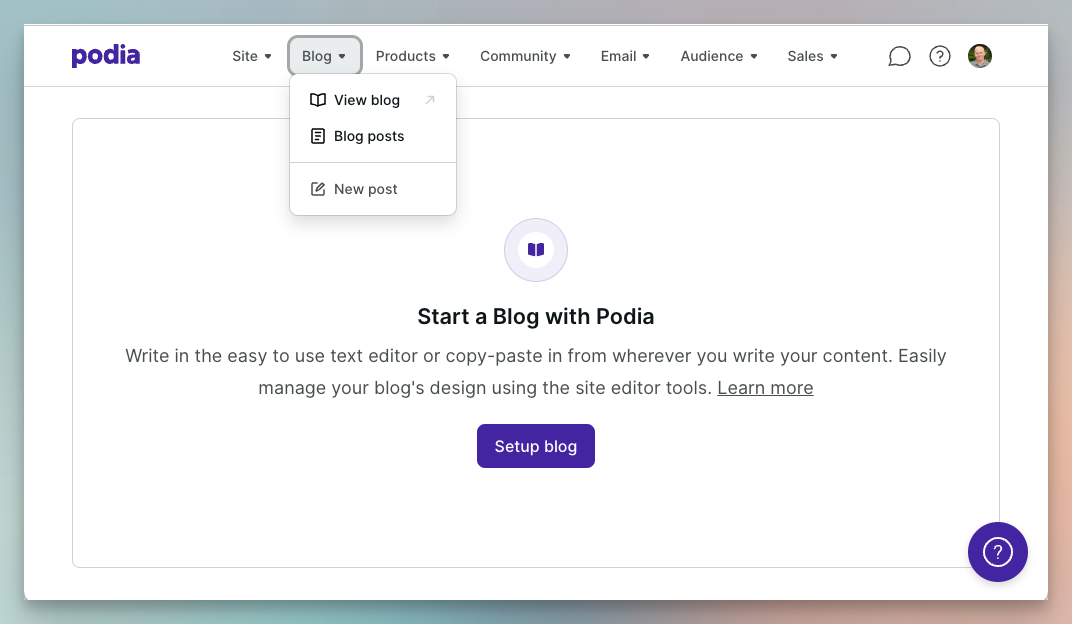
To get started, you’ll need to active your blog. Just click “Blog posts” under the “Blog” menu and you’ll be invited to setup your blog.
When modifying the design of your blog, there are really just two areas to focus on at the start:
- your post page which acts as a design template for all of the blog posts on your site
- your blog page which is effectively a table of contents that lists the blog posts available
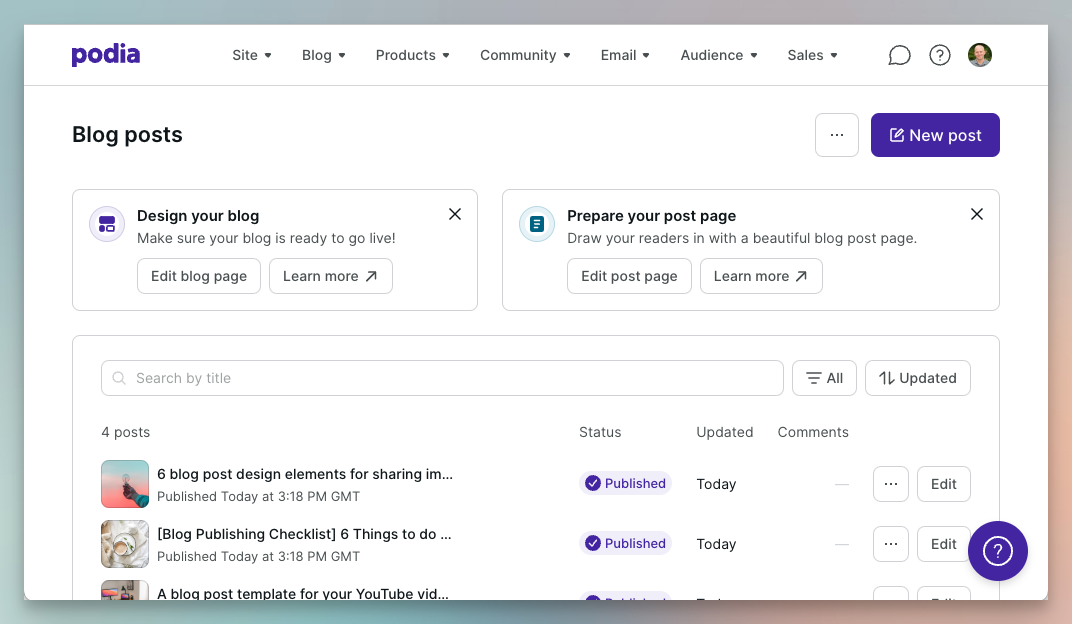
We’ll start with the post page. Fortunately, Podia pre-populates your blog with a few example posts so that you have some content to work with.
Designing Your Post Page
A post page in Podia has the following basic structure: Post heading, Post content and Post comments.
Let’s look at each one in turn.
Post heading
The post heading is the area at the top of the blog post that displays the post title, the featured image, a short excerpt and a few other attributes like the publication date, author name and comment count.
Using the site editor, you can choose to display as many or as few of these attributes as you like (although title is mandatory for obvious reasons).
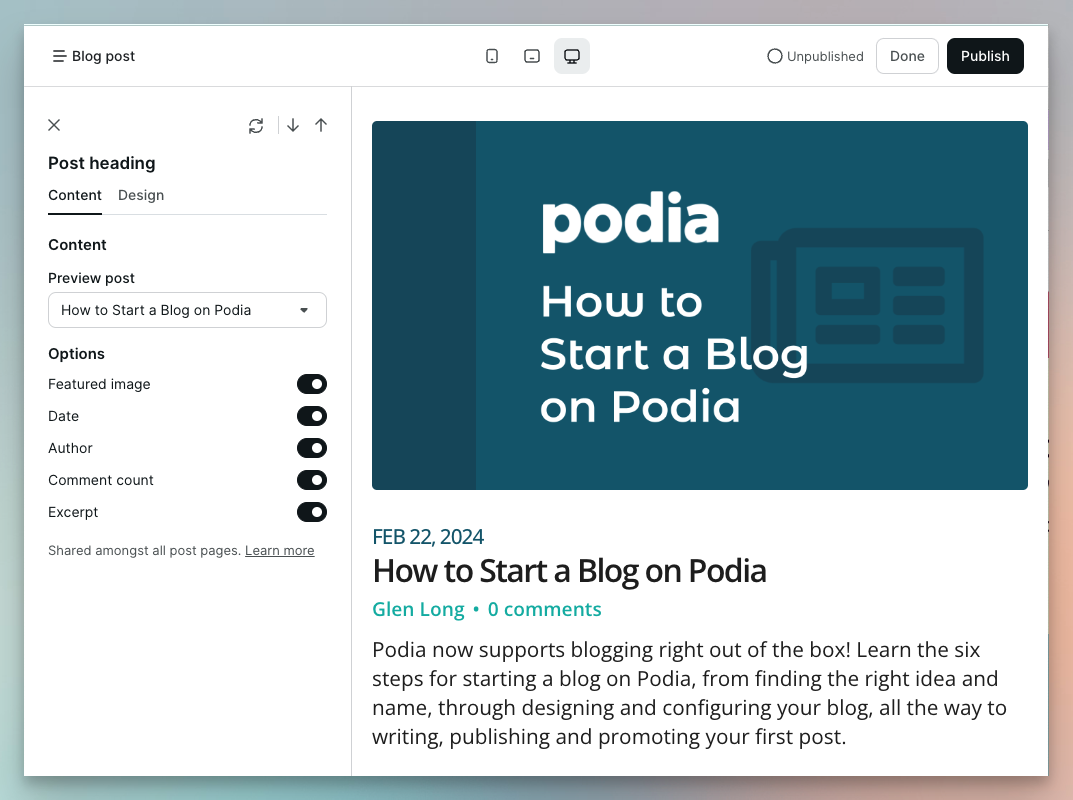
You can also control the styling of certain elements. One example is the featured image, where you can configure:
- The width and aspect ratio (aka proportions)
- The relative position, e.g., whether it sits above, below, left or right of the other header content
- The image style, i.e., plain, card, split, overlay or insert
You also have complete control over the colours of the various elements of the header (or you can choose to reuse themes from your site as a whole).
Note: Other design elements, such as font style and size automatically follow the settings you’re using elsewhere on your site.
Post content
The post content represents the main body of the post and contains all of the text and rich media content (like images and embedded videos) added to the post when it was created.
The internal layout of each post is mostly governed by its specific content, but you do have some level of control over the presentation which is applied to all of your posts.
For instance, you can modify the overall width of the main body of your post and also the spacing between the content and other sections, and the spacing between individual paragraphs. You can also add a background image.
Post comments
The post comments section is a placeholder for any comments that might be left on the post once it’s published. A published post will show comments from different users with replies organised as conversation threads.
Your styling options for comments are currently fairly limited but you can choose whether or not to include a avatar image for each commenter.
Anyone will who wants to leave a comment will need to register on your site first, but that’s no bad thing. It’s another way you can grow your site’s audience.
Note: As with the other blog post-related sections, the font style and size automatically follow your site’s more general design settings.
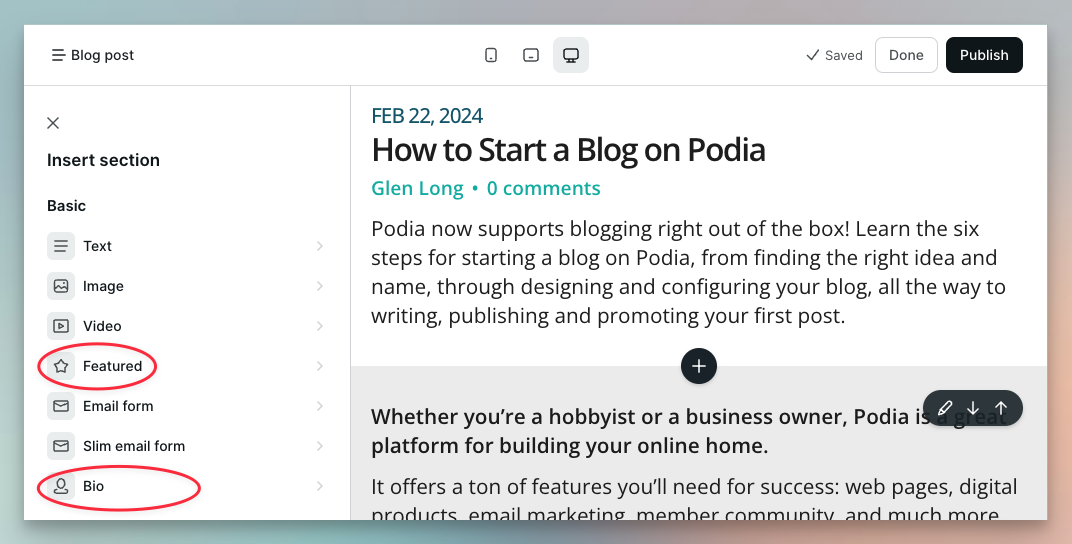
Adding more sections
One handy side-effect of using Podia’s regular site editor for designing your blog post page is that you can add other sections to your template too.
For example, you could add a email sign-up form at the bottom of each post to let people sign up for email updates about your latest content.
In fact, here are a few more ideas for using different Podia site sections on your blog post page:
- You could use the Bio section to showcase your experience as the author of the post.
- You could use the Featured section to include information about a paid product you offer.
- You could use the Links section to include links to your most popular blog posts.
That just about covers the process of designing your post page, so let’s turn our attention to the blog page, which is essentially your blog’s table of contents.
Designing Your Blog Page
The structure of your blog page in Podia centres around a Posts section, which is designed to display a list of your available posts.
As is true with all site sections in Podia, you have two configuration tabs to work with:
- the Content tab which determines what content appears on the page
- the Design tab which determines how the content looks on the page
Let’s start with the Content tab…
Content tab
If your blog page were only a list of posts, it would look a little bare, so the Content tab gives some options for configuring the top of the page. These are:
- Pretitle — a small introductory heading (e.g., “Latest Posts from the Blog”)
- Title — the main title of the blog (e.g., “Wellness Biz Marketing Tips”)
- Subtitle — a smaller subtitle or tagline (e.g., “My best thinking on how to promote your wellness business.”)
- Text — an introductory paragraph you can use to say more about your blog topic
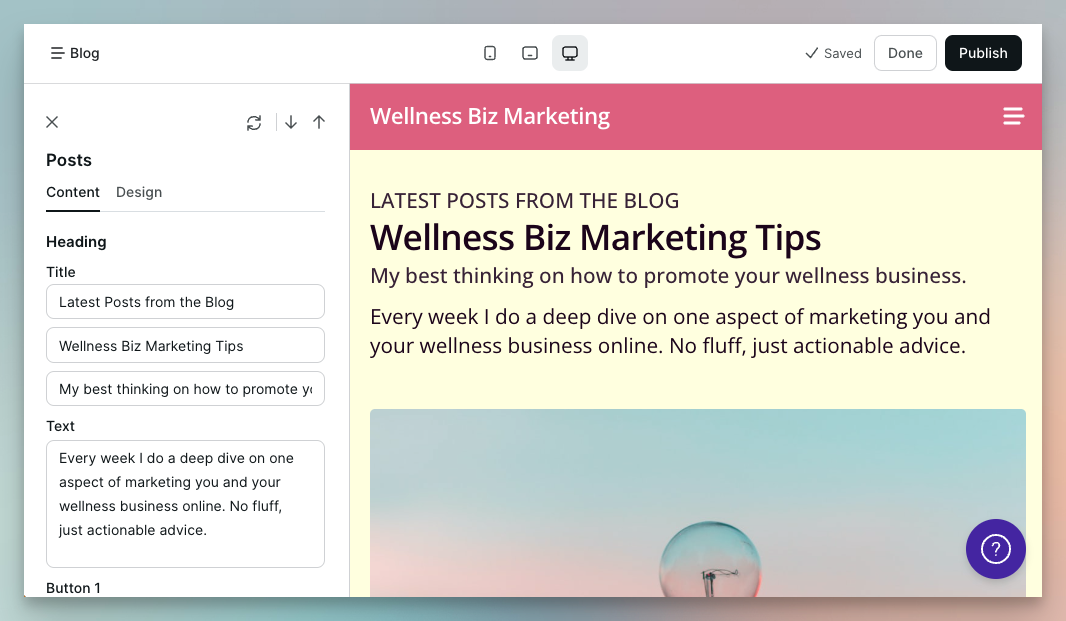
(You can also add one or two buttons linking to other areas of your site, for example an About page, or an external page, like a meeting booking tool.)
The Content tab also lets you decide exactly what information to show for each blog post in the list.
Specifically, you can switch any the following items either on or off:
- Featured image — a thumbnail version of your post’s featured image
- Date — the date post was published (e.g., “FEB 29, 2024”)
- Author — the name of the post author (if provided)
- Comment count — the number of comments users have left so far for the post
- Excerpt — a short summary of the post
- Button — a button (with an editable label) that users can click to read the post in full
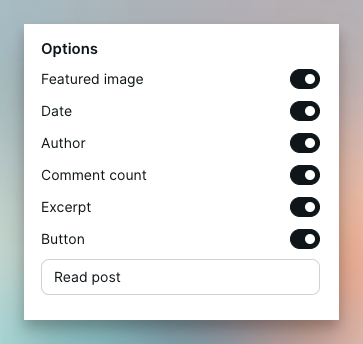
Note: The only element you can’t switch off is the blog post title. After all, there needs to be at least one element for visitors to click on!
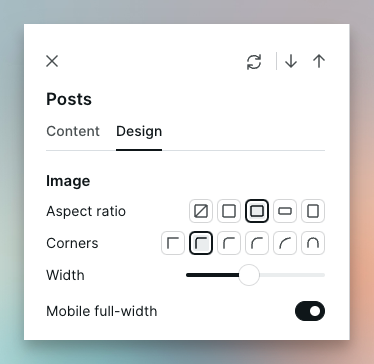
Design tab
The Design tab allows you to control how the individual blog posts (and the attributes you’ve chosen to show) are displayed on the page.
You’re really controlling two different things here: the appearance of the content for each post, and the positioning of those post elements relative to each other.
The thumbnail image is one of the most prominent elements of the blog post content, so we’ll start with that.
Here’s what you can customise:
- Aspect ratio — the proportions imposed upon the thumbnail images, i.e., natural (none), square, landscape, wide and portrait
- Corners — whether thumbnail images have rounded corners (and to what extent)
- Width — the relative width of the thumbnail image compared to the other post-related content
- Mobile full-width — whether the thumbnail occupies the full width of the screen on mobile devices
You can also control how the thumbnail image appears in relation to the other attributes such as post title using the Media drop-down.
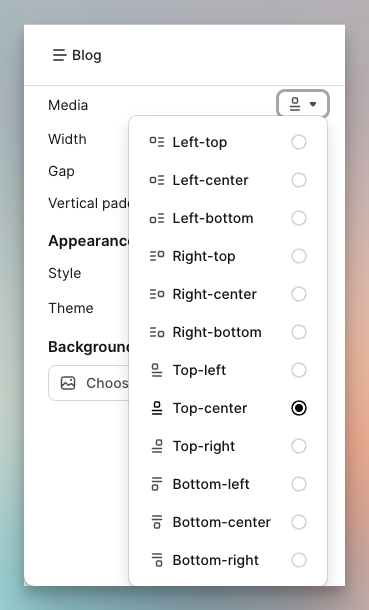
The different options effectively allow you to specify the position (left, right, top or bottom) and vertical alignment (top, centre or bottom).
In terms of the other post-related content, you can choose to align your text-based content (title, author, date, and so on) either left, right or centre.
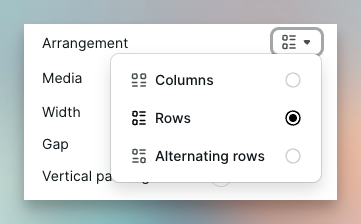
When it comes to deciding the overall layout of the post on the page you have three options via the Arrangement drop-down:
- Columns — blog posts are arranged into vertical columns (either one, two or three columns depending on the available screen width)
- Rows — blog posts are arranged into rows with one blog post per row
- Alternating rows — same as Rows except the position of the thumbnail image alternates from left to right
When you combine all these options you really have a lot of flexibility to create a distinctive design for your main blog page which is also consistent with the rest of your Podia site.
So those are the options for customising the look and feel of your post page and blog page.
With your blog design in place, it’s time to start writing!
Step 4: Write Your First Blog Post!
Writing effective blog posts is part-art and part-science and I couldn’t hope to do the subject full justice here.
However, the basic steps are pretty simple:
- Choose a relevant topic
- Pick a blog post type
- Craft a compelling title
- Write your knockout post
Let’s deal with them one at a time.
1. Choose a relevant topic
Just as your blog as a whole has a topic, each post you write will also have a topic (or perhaps more accurately a subtopic) within that broader topic area.
Here are some ideas for topics you could write about:
- Topics you already know your target audience is interested in. Use your understanding of their problems and goals. (If you’re not sure, spend some time in communities where your audience hangs out.)
- Topics that have already proven popular with your target audience. What topics lie behind content that’s been popular on social media? (If it was popular once, it’s likely to be popular again!)
- Topics your audience is searching for on Google. There are lots of keyword analysis tools that will tell you the most popular search keywords and some (like SEMRush) allow a small number of free searches every day.
Tip: Try taking an already popular topic and creating a blog post that comes from a different angle, or goes deeper on one aspect than existing posts.
You could also ask ChatGPT: “what are some good topic ideas for a blog post about X?”
Whatever topic you choose make sure you have something to say about that topic (or can spend time on research to find something interesting).
2. Pick a blog post type
While you could just jump in and start writing about your chosen blog topic, keep in mind that successful blog posts often fit a recognisable type.
Here are a few different blog post types you could try:
- a How to post is a super practical post that describes how to achieve some desirable goal or result (a bit like this post which is all about starting a blog)
- a List post is a shorter post with a simple structure based on a list of items with a connecting theme, such as “10 Ways to Save Money on Your Weekly Groceries”
- a Resource post curates the best articles, podcasts, books, YouTube videos, and so on around a specific subject
- a Manifesto post lays out your values and beliefs as they relate to a specific topic or issue and inspire people to follow your lead
- a Case Study post dives deep on a real-life story and draws valuable lessons for your readers
Whichever post type you choose, I recommend studying a few popular posts of that type to get a feel for the typical structure.
Note: Some post types tend to be longer than others. For example: a quick list post might be just a few hundred words, whereas a detailed “How to” could be several thousand.
3. Craft a compelling title
Most of us are bombarded with information online and so you only have a split second to catch your people’s attention.
A compelling blog post title will cause potential readers to “stop the scroll” and click on your blog post title to find out more.
Here are some quick strategies for writing killer titles:
- Create curiosity — “This Simple Hack Will Double Your Productivity” (Ooh! What’s the hack?)
- Offer a benefit — “How LinkedIn Power Users Get More Engagement” (Yes please — I’d more engagement on LinkedIn!)
- Use emotion — “4 ‘Harmless’ Habits that are Making You Miserable” (What are they? I don’t want to be miserable!)
Here are some more tactical tips:
- Don’t make your title too long — 50 to 60 characters is about right; titles that are too long are harder too read and can get truncated in certain contexts like search results
- Add numbers and punctuation — numbers and symbols (if used sparingly) can help you stand out, e.g., “The #1 Reason Most Diets Fail” or “How to Write a Blog Post (+ Templates)”
- Include the main keyword — if you’re targeting a specific search term, make sure it’s in the title, preferably near the start, e.g., “Vegan Keto Recipes: 10 Easy Meals Anyone Can Make”
Note: Your blog post title is so important I recommend brainstorming at least ten possibilities before choosing the final version.
4. Write your knockout post
This isn’t the place for a detailed “how to” on writing blog posts, but here are some tips for creating written content that people actually want to read:
- Keep your writing style light and conversational. Even a business audience will be put off by a “wall” of dry, dense text.
- Try to include a few ideas that are unexpected or go against the grain. People don’t like reading the same advice as they’ve seen elsewhere.
- Vary your sentence length to keep things interesting. Also, use short paragraphs to create “breathing room” in the form of white space around your content.
- Use rich formatting like headings, bulleted lists, quotes, and so. It breaks up the text and creates more visual variety.
- Add images, diagrams and even embedded video. Using more visual media types throughout your post helps to keep things interesting.
Warning: It’s tempting these days to use ChatGPT to write your content for you, but you’ll struggle to stand out from the crowd if you lean too heavily on that approach.
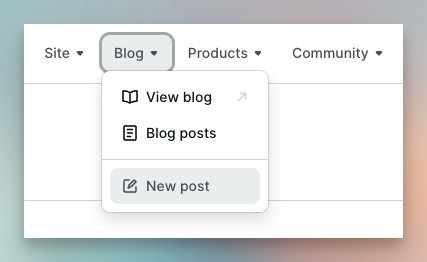
How to create a new blog post in Podia
To get started, you can just select “Blog > New post” from the top menu on the Podia dashboard and start writing.
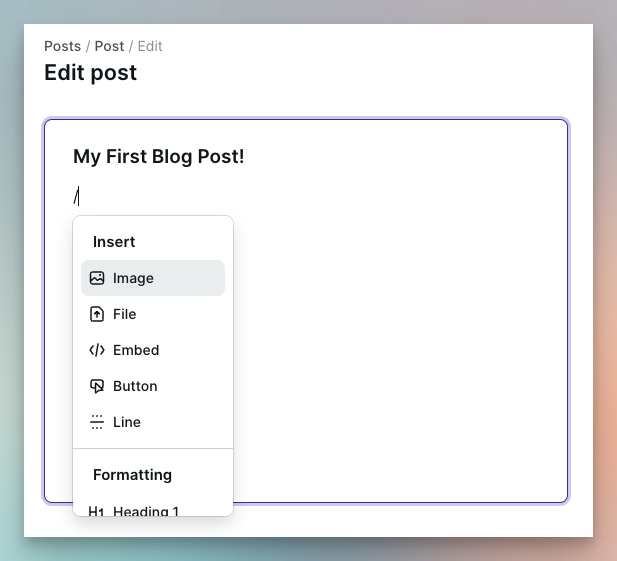
The blogging feature uses the same rich text editor Podia uses across the platform, which makes it easy to add the formatting and styling you’ll need for a engaging blog post.
Typing a forward slash (/) will bring up a contextual menu that allows you to insert headings, lists, code blocks and quotes, as well as other elements like files, embeds, buttons and dividers.
Alternatively you can write your content in another tool, like Google Docs or Notion, and then paste it into Podia when you’re ready. In most cases the basic formatting is faithfully preserved.
Once your content is in place there are a few additional settings you’ll need to configure. Let’s learn what they are.
Step 5: Configure Your Blog Post Settings
Before publishing your post, a few important settings need to be configured.
Podia organises these settings into three separate tabs: Summary, Details and SEO.
Let’s see what each tab lets you do.
Summary Tab
The Summary tab covers some of the most basic settings for your blog post.
Here’s a quick list of the settings you’ll find:
- Post date — you can publish your post immediately or schedule it for a future date and time.
- Author — use this field to credit the author of the post, which is most useful for multi-author blogs but also lets you claim credit for your work.
- Post URL — this lets you set the web address where the post will be published.
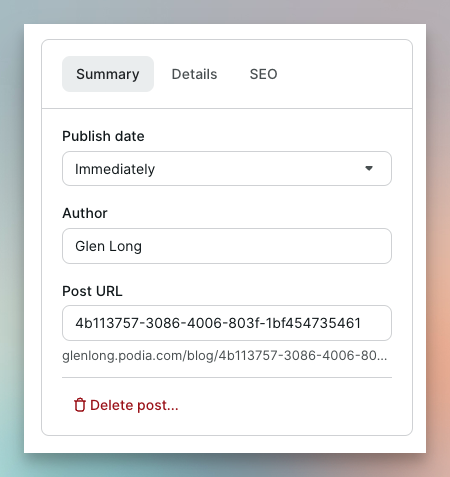
The post date defaults to “Immediately” and the author name defaults to the site owner.
However, the post URL is initially a bunch of random numbers and characters so you should definitely change that to a more readable URL.
For instance, if you’ve written a list post with a collection of tasty vegan and keto-friendly recipes then your post URL could be simply “vegan-keto-recipes”.
Note: if you’re targeting a particular SEO keyword it’s also a good idea to make your post URL closely mirror the keyword.
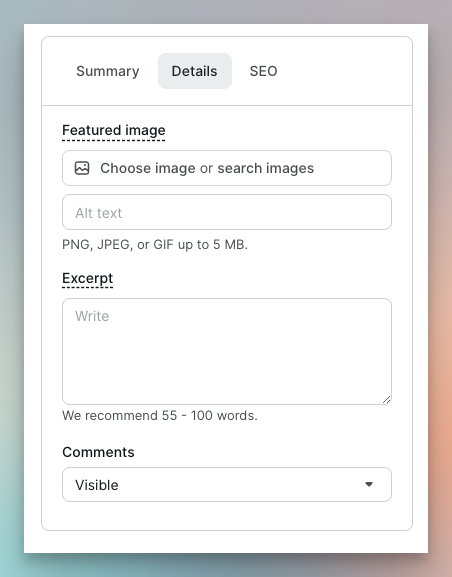
Details Tab
The Details tab allows you to configure some additional settings affecting the overall appearance of your blog post, specifically: Featured image, Excerpt and Comments.
These deserve a little more explanation, so let’s do that now.
Featured image (optional)
The featured image is the cover image for your blog post that will appear at the top of the post itself and in thumbnail form on your main blog page.
A featured image is a great way to make your post as eye-catching as possible and Podia makes it easy to add one — you can either upload an image from your computer or select one from the free image library Unsplash.
It’s worth taking your time when choosing an image. Here are some tips:
- Avoid generic images from mainstream libraries. These can make your content look boring and predictable. Instead try crowd-sourced images from libraries like Unsplash, Pexels and Pixabay.
- Choose bold, simple images without lots of fine detail. These will still be clear at smaller sizes, for example when used as thumbnails on your main blog page.
- Choose eye-catching images over literal ones. Your featured image needn’t perfectly capture the whole topic of your post. Choose one that’s likely to catch people’s attention and has some loose thematic connection with your topic.
Note: the featured image is also the one that will appear as a thumbnail when you share the post on social media, unless you override it with an alternative (see the next step).
Excerpt (optional)
An excerpt is a short, handcrafted piece of text that summarises your post and is used on the main blog page to give a quick summary of your post. You can also choose for it to appear at the top of the blog post itself.
Think of the excerpt as a teaser or trailer that further engages the reader’s attention and makes them want to read the full post.
Note: this is also the text that search engines will use in their results pages instead of pulling a sentence or two from the body of the post (again, unless you override it — see the next step.)
Comments (visible/hidden)
You can choose whether or not to allow comments on a post-by-post basis.
Comments encourage engagement with your readers but on the flip side, when you’re just starting your blog and have few readers, it can be counterproductive for visitors to see lots of posts with zero comments.
Regardless, you can use this setting to determine whether or not your blog post will allow users to leave comments.
Note: I recommend enabling comments to begin with and encouraging people to comment when promoting your post. If you don’t get any comments you can always switch them off later.
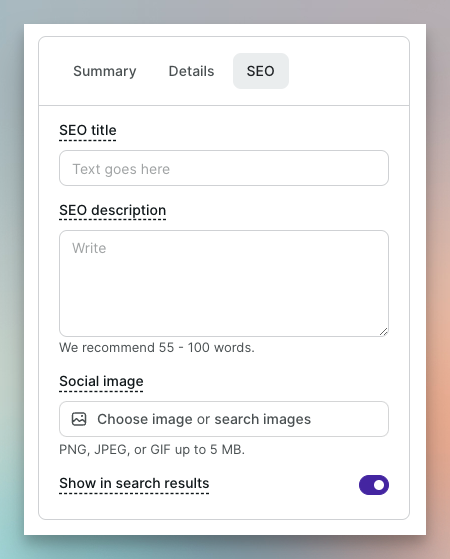
SEO Tab
The SEO (search engine optimisation) tab lets you configure your search and social metadata.
Metadata is just a fancy word for the less visible (but equally important) information associated with your brand new blog post.
Here are the settings you’ll find under this tab:
- SEO title — this is an alternative title for your post, designed specifically for search engines (since you may want it to be different from the title that appears at the top of your post).
- SEO description — similarly, this is a description of your post designed for search engines, to be used if you don’t want search engines to use your excerpt text as the summary.
- Social image — this is an alternative image if you want to show a different version on social media. For instance, you may want your social image to have more visible branding since it will be seen outside the context of your website.
- Show in search results (on/off) — in certain rare scenarios you may not want a blog post to be indexed by search engines to avoid it appearing in any search results pages.
If you know a bit about SEO you’ll be comforted by knowing you have this level of control.
If you don’t, these settings may seem a little confusing. However, leaving them untouched and just relying on the defaults will be perfectly fine in most scenarios.
Step 6: Publish and Promote Your Post
Once your blog post is ready for prime time you can click “Publish” to make it visible on your site.
Then it’s time to promote it as widely as possible to give it the best chance of success.
Here are some options to consider:
- Share on Social Media. Share your hard work with your social media followers and don’t just share it once on each platform, create multiple social media posts in the days following publication that promote your post from various different angles. Remember that only a minority of your followers will see each of your social posts so you need to post several times for decent coverage.
- Share via Email. If you already have a newsletter or email list then you have a captive audience for sharing your post. Create an email with a compelling subject line and tell people in the body of the email why they should read it. Even if you don’t have an email list yet look in your email address book and see if there’s any one who would be interested in your post.
- Share in Communities. If you belong to any relevant online communities where sharing your work is permitted, these are perfect places to mention your latest blog post. Instead of just dropping a link, create a thoughtful post explaining why you think it’s valuable and why you wrote it in the first place.
- Share with Influencers. If you happen to know connected people whose audience overlaps with yours, you can drop them a line to tell them about your post and the value it offers. Don’t spam people you don’t know, but if there’s an existing connection and your post is relevant they might well share it.
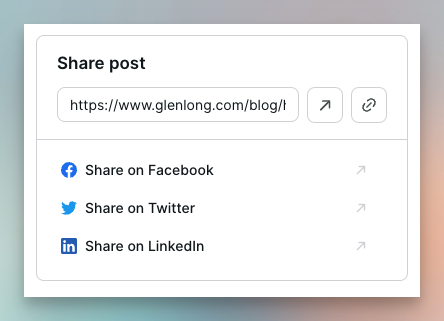
Note: Immediately after publishing a post, Podia gives you some handy links for sharing it on Facebook, Twitter and LinkedIn. It also prompts you to create a new email broadcast to notify any subscribers you might already have.
When it comes to blog post promotion, the key takeaway is that writing and publishing your blog is only the first half of the blogging process.
The more you promote it, the more traction you’ll see, and the “bigger bang” you’ll get for the effort you invested.

Current Limitations of Podia Blogging
It has to be said, Podia’s blogging feature is already impressively full-featured right out of the gate. However, this first version does has a few limitations that you’ll want to be aware of.
So before we wrap things up, here’s a quick summary:
- No tags or categories. You can’t assign a category or any tags to your blog post, which would improve navigation for site visitors and create content “hubs” for popular subtopics. (However, I understand these features are on the near term road map.)
- No embedding of blog posts on other site pages. I’d love a site section that lets you include a list of recent blog posts on any Podia page, not just the main blog page. For instance, it’s common practice to show a selection of recent blog posts on your site’s home page. This isn’t currently possible, but fingers crossed for the future!
- All post URLs start with “/blog/”. While you can control the last part of your blog posts’ URLs, right now your posts all live under a hardwired “blog” sub-directory. This is fine for brand new blogs but could cause major problems for anyone migrating from a platform which doesn’t follow that specific convention.
- No option to configure posts-per-page. If you have more than a handful of blog posts you’ll want the option for visitors to page through them in batches. Currently there’s no way to tell Podia how many posts you want on each page. (I believe it defaults to 12 right now.)
In addition to addressing the limitations above, here are some additional blogging features I would love to see Podia implement in future versions:
- Automatic creation of email broadcasts for promoting new posts. Instead of just creating an empty broadcast I would Podia to pre-populate an email with my blog post details to make it quicker and easier to send an update to my email list
- Better support for lower-level headings in the text editor. Currently Podia only offers two levels of headings within the text editor. Longer blog posts (like this one!) will require more headings to create an optimally readable post and a clear structure is important for SEO too.
- Support for social sharing icons on post pages. While Podia does provide links to allow the site owner to share their new post on social media, it doesn’t provide buttons on the post itself to allow readers to do the same. Most of these gaps are fairly minor and I’m really excited about the blogging feature and what it makes possible for Podia users as a result.

Ready to Start a Blog on Podia?
If want to start a blog, up until now Podia hasn’t been high on the list of platforms for hosting it.
However, this latest update is a very confident move into the world of blogging.
What’s most exciting is that once you’re blogging on Podia, a world of possibilities opens up.
That’s because Podia already has the features (like email marketing) you need to grow your blog and those you need (like digital products) to build a profitable business around it.
So if you’ve decided it’s time to start a blog, or you’re already blogging but you’re feeling frustrated or restricted by your platform, give Podia blogging a try.
It’s easy, intuitive and even fun. It’s exactly how blogging should work.
* Affiliate disclosure: I’ll get a small commission if you upgrade to a paid plan. However, I only recommend products I personally use or have used.