How to Add a Community to Your Course in Podia
Okay, so here's the situation…
You've created an awesome online course on Podia and you’re ready to sell it.
But you also want to create a community to support the people who buy it.
Podia supports both courses and community so it should be easy, right?
Well it is… if you know what you’re doing.
You see, depending on how you want things to work (and whether you already have a community) there are a few details you’ll need to understand.
Let’s break it down.
Setting Up Your Community, Plan and Topics
We’ll start with the simplest scenario, where you don't yet have a community on Podia. In other words, you have the luxury of using this feature exclusively for your course.
(If you haven’t touched the community feature yet, you’ll need to activate it by going to “Community > Home” and then giving your community a name. See this Podia Help Article for more information.)
Even if your community is already activated (maybe you did some basic setup when you first created your Podia account) you may want to change the name.
What’s in a (community) name?
The name of your community is important because your course buyers will see it in a few different contexts.
For instance, when they join they’ll receive a welcome email with your community name prominently in the subject line. (We’ll dissect that email later.)
So if your paid course is called “Basket Weaving for Beginners”, you could call your Podia community “Basket Weaving for Beginners Community”. Or maybe “The Basket Weaver’s Collective”.
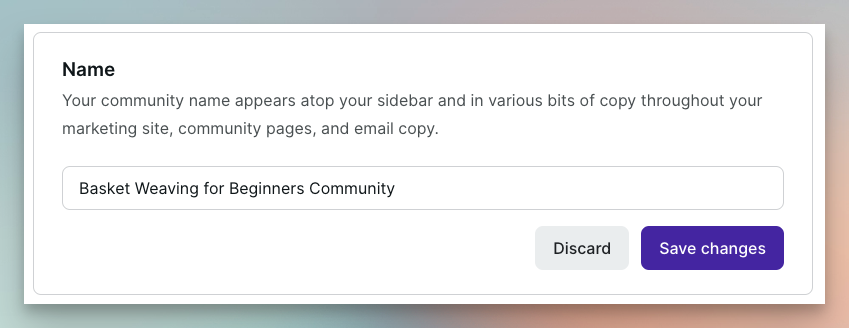
Whatever you call it, make sure it’s obviously connected with your course topic.
Tip: When naming your community, also consider whether you might want to let other groups of people into your community in the future. If you end up supporting more than one course, or offering an entry-level plan that anyone can join, a course-specific community name might not work so well. (But don’t worry, you can always change it later on!)
Configuring your community
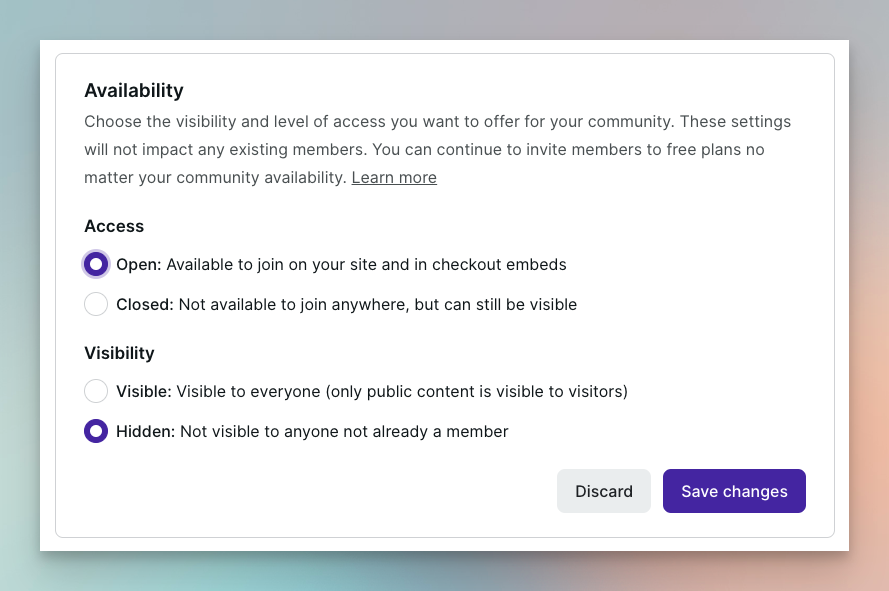
Okay, so you’ve activated your community (if it wasn’t already) and given it a name.
Next, go to the main community settings and make sure the access is set to “Open”. (It’s not necessary for all scenarios but it’s the most flexible option for now.)
Also, set the visibility to Hidden. You don't want random site visitors stumbling across it and trying to sign up!
Setting up your plan
Plans are how Podia users get access to your community, so your course buyers will need to belong to one.
Plans in Podia can be paid (i.e., via a monthly fee) or free. We’ll use a free plan.
(I know, using a free plan for the community of a paid course is counter-intuitive, but stay with me…)
People who’ve paid for your course won't expect to pay an extra monthly subscription for the support community! Hence the free plan.
(I'm not saying you’d never have a paid course with a paid membership attached, but it's less likely.)
Fortunately, when you activate your community, a free plan is automatically created for you. And you can use this free plan for your course buyers community.
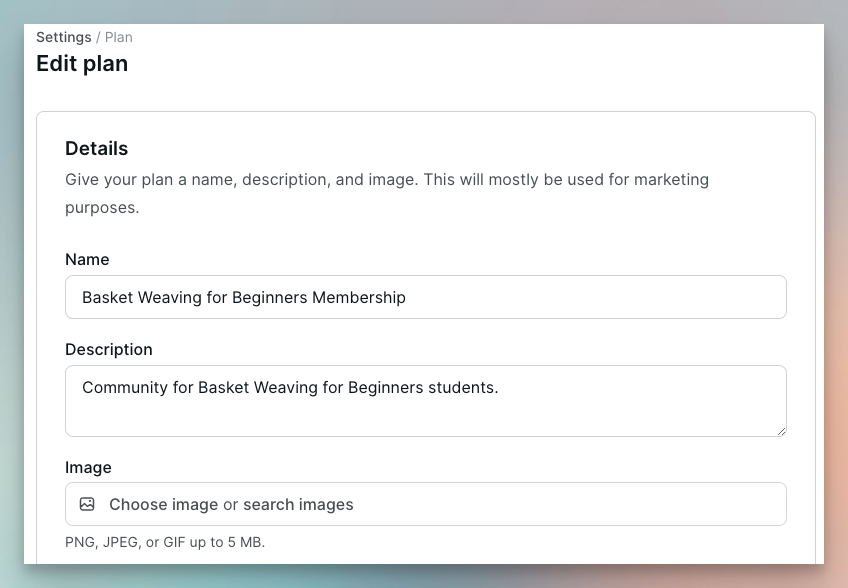
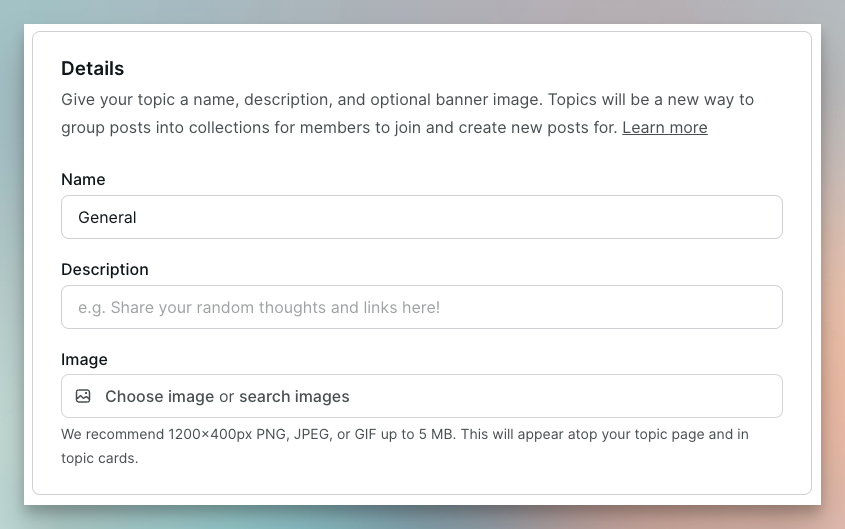
Name, Description and Image
Change the plan name to something more meaningful like “Basket Weaving for Beginners Membership”. Or “Basket Weaving VIPs”. You can also add a description and upload a banner image.
Tip: Make sure that the plan name and overall community name are consistent with each other since users will see both in the welcome email. (We’ll explore that email more in a moment.)
Included products
Again, it’s counter-intuitive, but under “Included products”, do not select your course!
Customers should have access to the course by virtue of their product purchase, not their membership of the free plan.
So leave it blank.

Note: If you were to include your course in the plan it would mean that anyone “sneaking into” your community (see how that unlikely situation could occur below) would have free access to your course as well as your community.
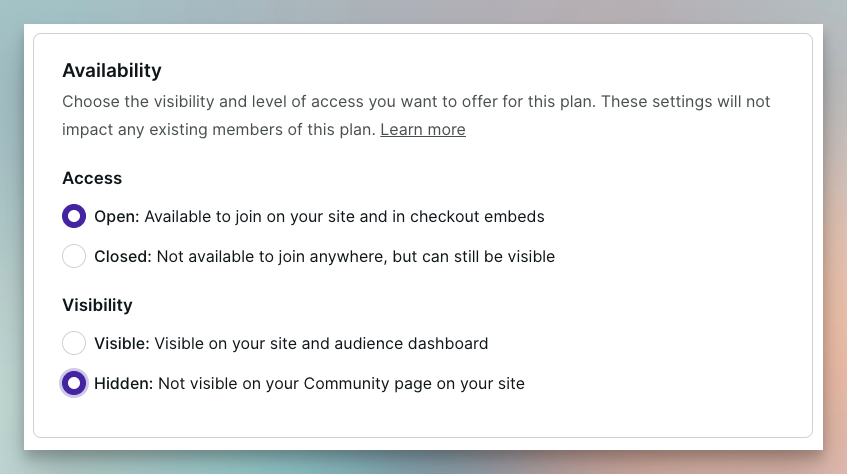
Availability
Under the plan’s Availability, set the Access to “Open” and the Visibility to “Hidden”. (Hidden is not technically necessary at this stage but it’s safer if you think you might one day open up your Podia community to non-course buyers.)
Next, you’ll need to make sure that the plan gives your course buyers access to the right topics.
Remember: Topics are how members access your community — the community is really just an umbrella for the topics your members get via their plan.
But first you’ll need to decide what topics you’ll need.
What topics do you need?
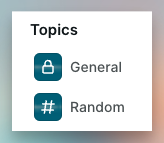
When you first create your community, Podia creates two topics for you: General and Random.
(Both are set as “default” topics meaning that members who have access cannot unfollow them.)
Handily, you can reuse these topics for your course buyers. General could be used for course-related discussions and Random for everything else. (However, you can change the names to whatever you like.)
Tip: I find it’s also a good idea to create a new topic called something like “Announcements” where you’re the only one who can create new posts.
Creating a creator-only topic like this means there’s one place where members can find important updates from you without them getting lost in the noise of other discussions.
(You can also encourage people to keep email notifications for that topic switched on, even if they switch others off, so they don’t miss important information.)
Example topics for a course community
Ultimately, it’s up to you how you want to structure your community. But here’s an example which includes few more topics:
Announcements 📣
Introductions 👋
Feedback & Support ⛑️
Calls & Recordings 👥
Watercooler 🥤
Tip: Putting numbers at the front of your topic names means you can control the order in which they appear in the members’ sidebar.
As with plans, topics can also have a description and a cover image.
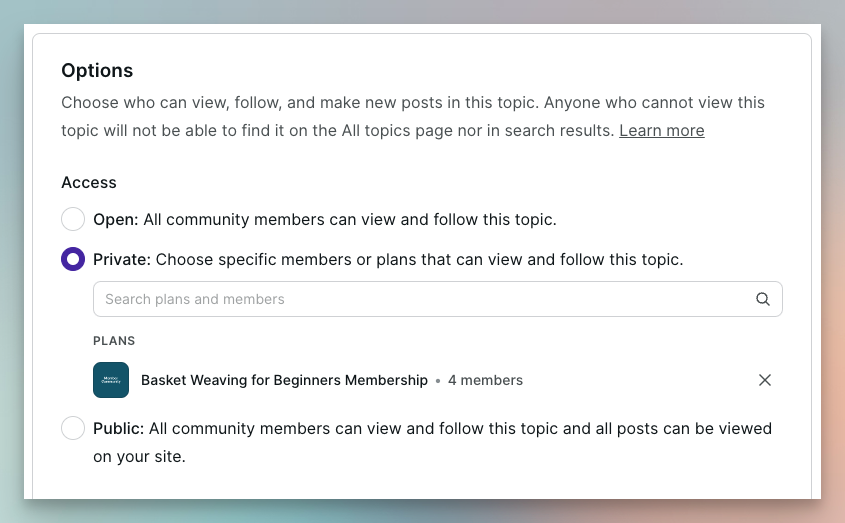
Locking down your topics
To make sure only your course buyers have access to the topics you create, both now and in the future, you’ll need to change the Access from “Open” to “Private” for each one and then select your free plan.
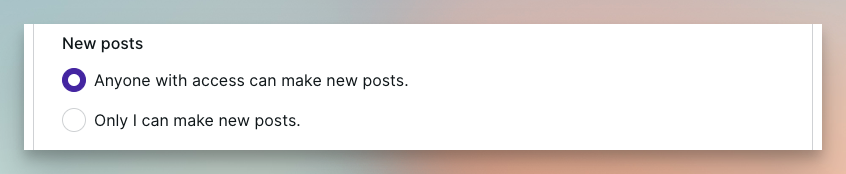
New posts
Under “New posts” keep the initial setting of “Anyone with access can make new posts”.
(Unless you’re configuring a creator-only Announcements topic, in which case set it to “Only I can make new posts”.)
Default notifications
Under default notifications, I prefer to keep everything checked and let members “dial it down” later if they want to. Otherwise they may miss posts they would have wanted to see.
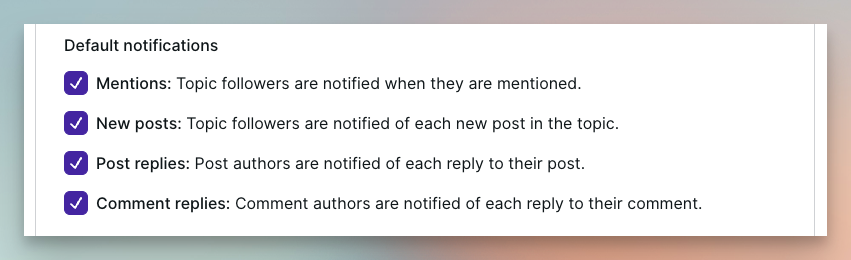
Note: You can’t force members to receive email notifications for a topic, even if it’s a default topic (see below), because they can always turn the notifications off.
Default topics
Default topics can be a little confusing. I’d personally prefer it if they were called “mandatory topics” or something similar.
But essentially default topics are topics that all members who have access will automatically follow and cannot unfollow. (So it’s a default setting they can’t change!)
All it really means is that those topics will appear in the left-hand sidebar, and posts from those topics will appear in the Home feed.
Think of it this way, without at least one default topic you could have the situation where a member’s community feed is completely empty.
I prefer to make all of the topics default.

Note: For reference, Podia’s own creator community has all but one of their eight community topics set as default topics.
Giving Course Buyers Access to the Community
Now, let's talk about how your course buyers actually get access to the free plan (and, by extension, your community topics.)
Ideally, they would be granted automatic access the moment they buy your course. Right now, that's not possible solely within Podia, although you can do it with a Zapier integration.
However, let’s talk about the “pure” Podia options first…
Method 1: Invite buyers by email
The first method is super simple, and it involves manually inviting people to the community using their email address.
This works best when there is a relatively small number of buyers, e.g. dozens not hundreds at a time.
Just go to the community settings page, find your free plan, click the three dots next to it and select “Invite member…”.
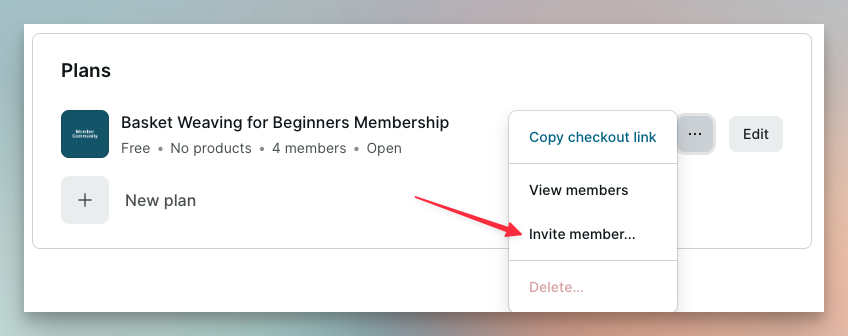
One advantage of this method is that it’s always available to you, even if everything is locked down as tightly as possible (i.e., the community and the plan are both marked as “Closed”.)
The disadvantage is the manual effort involved from you, and the fact that there will be at least a small delay between somebody buying the course and being invited by you into the community.
But it’s straightforward and reliable!
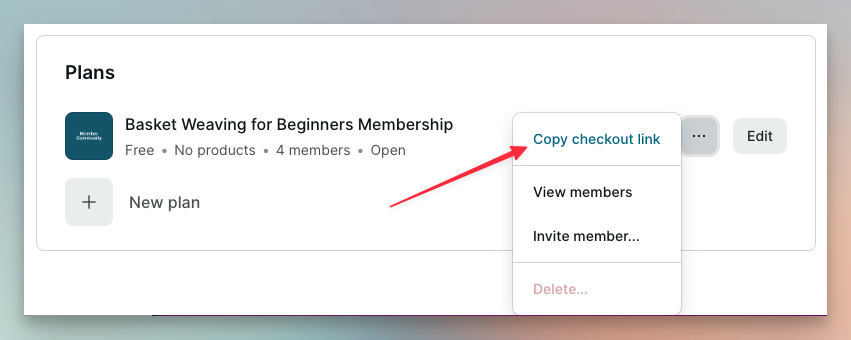
Method 2: Send buyers a checkout link
The other “pure Podia” method is to send new course buyers a checkout link they can use for signing up to the community.
You can do that either via an email broadcast or (better still) an email campaign that’s triggered by their course purchase.
To use this method, you’ll need the checkout link for your plan.
Just find the plan again under Community > Settings, click the three dots next to the name, and select “Copy checkout link”.
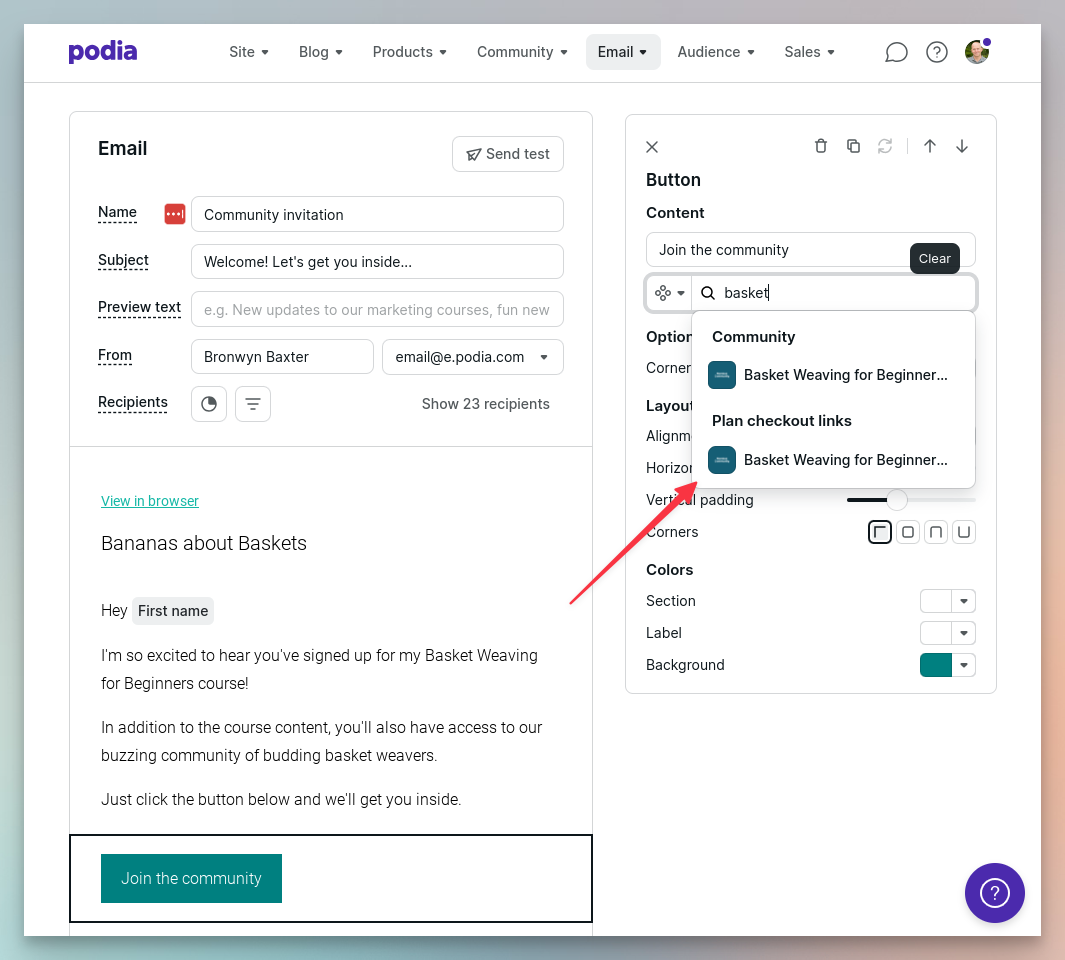
Alternatively you can use the advanced link tool to select the link directly from a drop-down when embedding a button in the email.
The advantage of this approach (assuming you create an email campaign) is that it doesn’t require any manual steps from you. When people buy your course, they’ll automatically be sent an email telling them how to join the community.
One disadvantage is that people don’t always notice emails and you may end up having to add them manually anyway.
Another subtle disadvantage to be aware of is this…
Given that the plan is free, there is the small possibility that an unscrupulous course buyer could share the link with someone who hasn't actually bought the course.
That person wouldn't actually have access to the course so it's a kind of an empty victory for them!
(I’ve never known this to actually happen, but it’s good to know.)
However, if you want to avoid this situation entirely, just use Method 1 or 3. You can also set both the community and the plan to “Closed” instead of “Open” for extra safety.
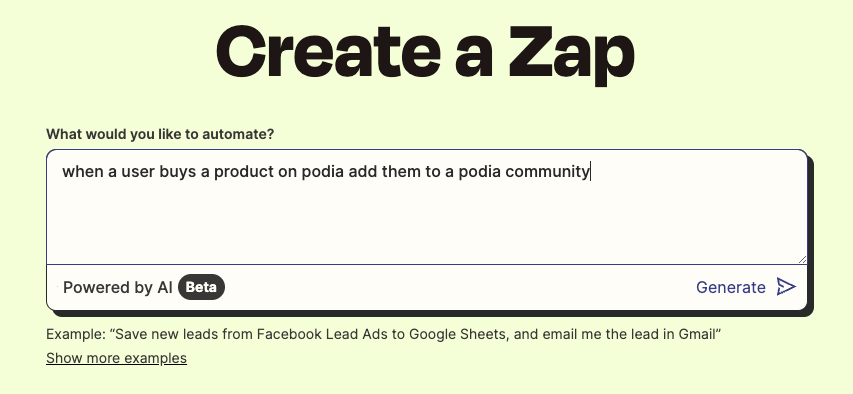
Option 3: Use a Zapier integration
The third method is to use a third-party tool called Zapier to automatically add new buyers to the right community via an automation called a “Zap”.
This is definitely a more technical solution and requires you to have a Zapier account (although the free plan works just fine) but it’s the most automated approach once up and running.
I won’t go into the full details here, but here’s a quick overview.
Assuming you’ve already integrated Zapier with your Podia account you can use its AI-powered tool to create the right Zap.
Click “Generate” and Zapier creates a Zap — a combination of a trigger and an action.
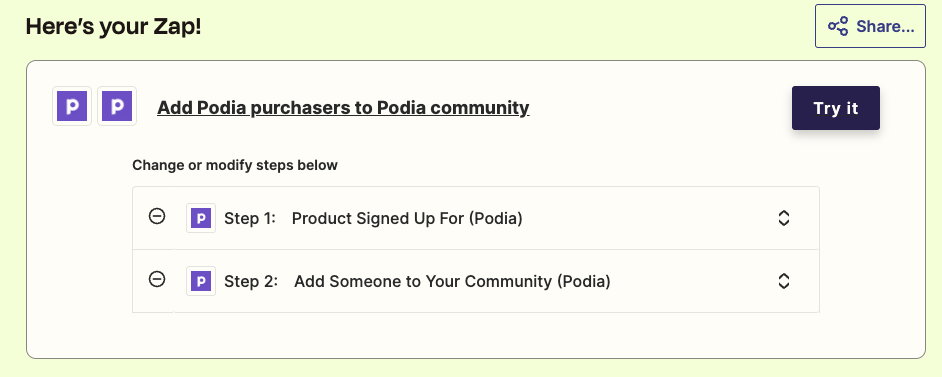
Then you can configure the trigger with the Podia online course product whose purchase should start the automation, and the action with the plan you want buyers to be added to.
Summary of the Main Steps
Okay, so that was a lot of detail! Here’s a quick summary of the main steps:
If it’s not already activated, activate your community
Give your community a name that’ll seem logical to your course buyers
Under the community’s Availability, set the Visibility to “Hidden” and the Access to “Open”
Find the default free plan for your community and rename it (and make sure the new name sits logically alongside your course name and your community name)
Do not add your course under “Included products” — leave it empty
Under the plan’s Availability, set the Access to “Open” and the Visibility to “Hidden”
Now create the topics you want your course community to have (or reuse/rename the General and Random topics that are created by default)
-
For each topic:
Under Access, select “Private” then select your free plan for course buyers
Set New posts as “Anyone with access can make new posts” (unless you’re creating a dedicated Announcements topic)
Set the default notifications (I prefer switching all notifications to on, then providing clear instructions to buyers on how to dial down the notifications if they want)
Set the default topic status (I personally prefer setting all topics as default)
-
Give course buyers access to the plan using one of the following methods:
Invite buyers individually by email (”Community > Settings > Plans > [Your Plan] > … > Invite members…”)
Use an email broadcast or campaign to send all buyers a checkout link (”Community > Settings > Plans > [Your Plan] > … > Copy checkout link”)
Create a Zapier integration to automatically add new course buyers to the right plan.
Deconstructing the Welcome Email
Regardless of how you invite people into your course community, they’ll receive a friendly welcome email generated by Podia.
For such a simple email, there’s a lot going on, and it took me a while to work out where all the information was being pulled from.
I think it’s valuable to understand because emails like these are all part of the onboarding experience for new customers, and if anything looks a bit wonky it reflects poorly on your brand.
Here’s a visual breakdown:
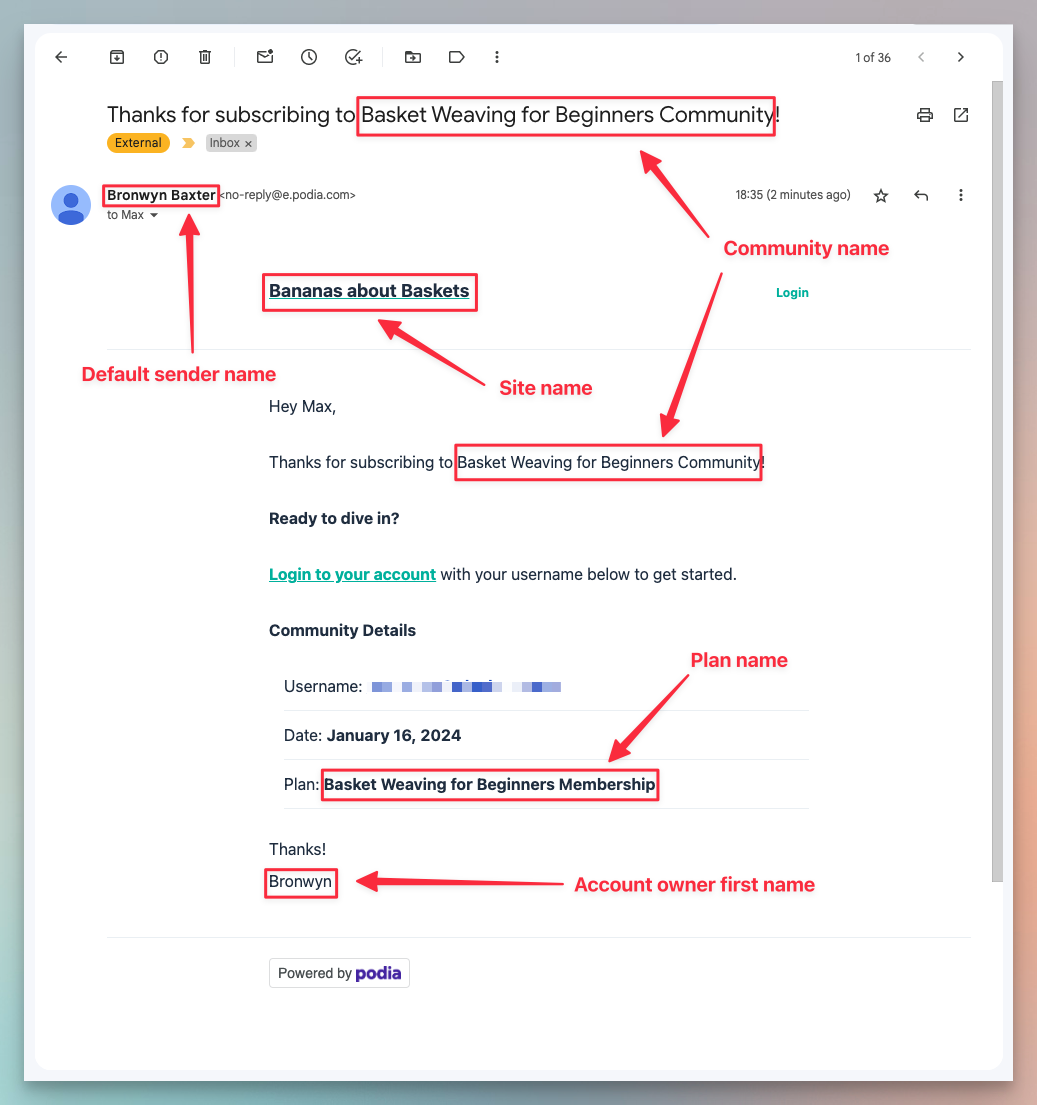
Here’s a quick explanation:
The email subject line is hard-wired to: “Thanks for subscribing to [Community Name]”
The sender name is whatever you’ve set as your Default sender under “Settings > Email”
The header text is your Site name, configured under “Settings > General” (unless you’ve uploaded a site logo)
The name at the very bottom of the email is the First name of the account holder under “Account > Personal”
The community name and the plan name are both mentioned within the body of the email
Note: You can’t (yet!) change the wording of this email or remove the Podia branding from the bottom of the email.
What If You Already Have an Active Community?
Okay, I’ve covered the simplest and I hope most common situation for course creators, the one where you can use your Podia community exclusively for your course.
But what if you’re already using your Podia community, for example to offer a free members area, or a more public community with posts visible to any site visitors?
Well, my friend, then things get a little bit more complicated!
The first thing to understand is that each Podia account supports just one community.
However, the good news is that you can serve different groups of people via separate plans that give them access to different topics.
The second thing to understand is that members can only belong to one plan at a time.
So if they belong to an existing free plan (let’s call it the basic plan) they can’t also belong to your free hidden plan for course buyers. So they’ll need to switch to the course buyers’ plan.
But here’s the thing…
If they switch plans (we’ll talk about the how in a moment), they probably won’t want to lose access to the topics they could access via the basic plan.
So here what you do…
You set up your course buyers’ plan so that it grants access to the topics intended for course buyers only plus the topics already in the basic plan. So it’s basically the sum of all the topics.
Note: A small side effect of this is that course buyers who weren’t already members of the basic plan will now see those topics too. But that’s probably no bad thing and they can always switch off any notifications if they want to.
Adding your buyers to the right plan
So how do course buyers get added to the right plan?
Well, if they’re not already a community member, it’s easy. You just invite them using either Option 1 (invite by email) or Option 2 (send checkout link) above.
But if they are already a member of your community via the basic plan, there’s a vital first step.
Either you or they will need to cancel their existing community membership.
Think of it as wiping the slate clean. Then you can add them to the new plan — again via Option 1 or Option 2.
By the way, don’t worry about a member’s posts and comments — they won’t be affected by their (temporary) cancellation.
Tip: If you choose Option 2 for maximum automation, you’ll need to include instructions in the email for both existing community members and new joiners, telling the former group about the cancellation process.
What if you have multiple courses?
So what about multiple courses?
Well, if your setup is more complicated even than the scenario above, for example because you want to support multiple paid courses, each with its own separate community topics, then the honest answer is that you’re really starting to stretch what Podia is designed to do.
It would be better to have a single hidden plan for all buyers, include just one default topic that’s relevant to everyone and then tell members to only follow additional topics for the courses they own.
It’s not perfect, and you’ll just have to grin and bear the fact that members can get access to discussions about products they don’t actually own (but not the products themselves).
Ready to Level-up Your Course with a Community?
Okay, we’re done! If you’re a course creator who wants to boost completion rates and results by adding a buzzing member community, you now know how to do it!
Get the Course Builder's Starter Pack
If you're curious about creating a course, this is 100% the best place to start.
You'll get: my collection of 100+ course creation tips, a fun and fast-paced video class, and a value-packed email series for regular inspiration.